Posts

Showing posts from March, 2006

Washhouse Toilet Install

Image
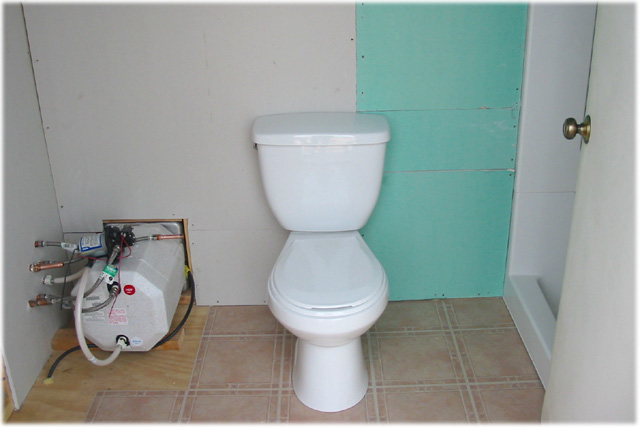
  Washhouse Toilet Install by admin on Mar.23, 2006, under WashHouse Toilet Install March, 2006. We installed some cheap linoleum tile on the floor so we could get a good seal with the toilet’s wax ring. It was still getting pretty cold at night when we installed this, so we have some concern that the tiles might not stick well to the floor. If not, we will use some adhesive later when it warms up this spring. Once we had the tile down, we measured 12″ from the wall for the toilet drain center. Then we checked left and right to make sure no floor joists would be in the way of the drain pipes. Once we settled on a location, we cut a 4″ hole in the floor for the water closet connection. This fitting is screwed to the floor, and the toilet is fitted with a wax ring around it’s outlet. The fitting has two adjustable bolts for the bowl. The bowl was then pressed down to squish the wax ring and make a good seal. The bolts were carefully tightened so the bowl would

Washhouse Water Heater Install

Image
  Washhouse Water Heater Install by admin on Mar.23, 2006, under WashHouse Water Heater March 2006. After measuring the location for the water heater, Tara is cutting the 12-3/4″ hole to install it. This is an RV-type water heater, which direct-vents to the outside, without needing to install a vent pipe through the roof. We’ve had an RV before, and think that the 6 gallon tank will keep up with our minimal needs. By the way, the sabre saw we are using works very well off of our 300 watt pure sine wave inverter and battery. A larger saw would draw too much, but this seems very efficient, and is a real time-saver over hand tools.   Cutting the Siding W/H Installed March, 2006. Next , we started cutting and framing the hole, we added a 2×4 support under the heater to keep it level, since the wall has a 2×4 on the floor. Then we applied silicone sealant to the door frame and installed the doorframe to the heater body. Then the whole thing slides into place f

Finishing the Washhouse Shower

Image
  Finishing the Washhouse Shower by admin on Mar.23, 2006, under WashHouse Shower Walls March, 2006. After carefully measuring and cutting the holes for the shower valve and a notch for the shower head,  we installed insulation in the walls and ceiling surrounding the tub. Then the shower walls were installed. First the back wall is set in place, then the sides interlock with the back wall. You then level the side walls and fasten them in place (I used screws). Finally the back wall is fastened in place.   Shower Walls Green Board March, 2006. Then Green Board (Kind of like drywall, but more water resistant) is cut to fit into place. I would have liked to use larger pieces for less joints, but the board is just too heavy and bulky to handle in this small space. There are quite a few rough spots that will need to be smoothed out when we tape and plaster it, but it’s dry and clean for now.   Green Board Oops… March 2006. We couldn’t figure out why the water

Plumbing Woes

Image
  Plumbing Woes by admin on Mar.23, 2006, under WashHouse March 2006. We had a real problem getting good solder connections on our trip last October. On one of the fitting locations, I forgot to clean and flux the connections after a dry fit, before I attempted to solder them. On others, I just had a really hard time due to the strong winds cooling off the pipes even while the torch was applied. We left with several leaks that we knew we needed to fix.   Bad Joints Solder Blob March, 2006. You can see solder blobs here which are obviously not a good example of a joint. I’m not sure if the green corrosion is from water or the flux I use. Another problem was tying to solder upside down under the shed. Note to self: Keep as much of the plumbing on the little house inside the structure, where the wind doesn’t blow, and you can work upright.   Solder Blob Fixing it March, 2006. First I cut out the whole section, as seen above. I brought it inside where I could w

Northern Arizona Sights… Flagstaff

Image
  Northern Arizona Sights… Flagstaff by admin on Mar.20, 2006, under Area About 70 Miles east of Seligman is Flagstaff. At 7500 feet in elevation, it tends to be a little colder there. These were taken on March 16th, 2006, at the end of a winter storm that had passed through the area. We were waiting for the storm to subside before we went up to the Ranch for Spring Break…Some Spring!   I-17 South of Flagstaff   This was taken on I-17 heading north, just south of Flagstaff. I always like the look of an open meadow.   Flagstaff Meadow   Looking across the interstate to see the snow gathered in the branches of the Ponderosa Pines.   Ponderosa Pines   We figured the roads on the interstate would be a little better plowed than the highway out of Prescott/Chino Valley that we usually take up to the Ranch. They were pretty good on this trip.  Icy Roads   

More March Snow at the Ranch

Image
  More March Snow at the Ranch by admin on Mar.15, 2006, under Seasons Meadow March 13th, 2006. Morning. The cattle have been running through our place. We were surprised to see so many trails with only a couple of days of snow to make them in.   Snowy Meadow in March South Hill March 13th, 2006. Morning. The snow had gathered in the branches of the Junipers. Most of it has melted by now, but there was some left.   Juniper in the snow Black Mountain March 13th, 2006. Morning. The cattle don’t lift their feet much, so they leave little drag marks.   Cattle Trails in the snow Black Mountain March 13th, 2006. Morning. Doesn’t look that Black right now…   Snowy Black Mountain Campsite March 13th, 2006. Morning. A view of our campsite, and the conditions we get to work in this morning!   March Snowy Campsite West to the Flats March 13th, 2006. Morning. Looks like the Flats got their share of snow, too.   Snow on the Flats Wash House March 13th, 2006. Morni

Yes, Sometimes it snows in March…

Image
  Yes, Sometimes it snows in March… by admin on Mar.15, 2006, under Seasons Markham Pass March 12th, 2006. Late Afternoon/Early Evening. March is a month of transition. This year, we had a winter storm pass through on March 10th – 12th. The lower elevations, like here, only got a few inches, and most had melted by the evening of the 12th.   Markham Pass Snow West along I-40 March 12th, 2006. Evening. The sky was clearing in the west as we entered the Ranch.   West off Markham Pass Markham Pass March 12th, 2006. Evening. Markham Pass was frozen as we entered, so while it was a little slippery, at least we didn’t sink a foot into the mud   Tracks in the snow on Markham Pass Turning East March 12th, 2006. Evening. As we turn east through the second gate on Markham Pass, we can see that we are the only travelers on this road today. Not even cattle trails yet!   Fresh Snow North Mountain March 13th, 2006. Morning. We had about 8 inches of snow on top of the