Posts

Showing posts from March, 2011

Bathroom Sink Install

Image
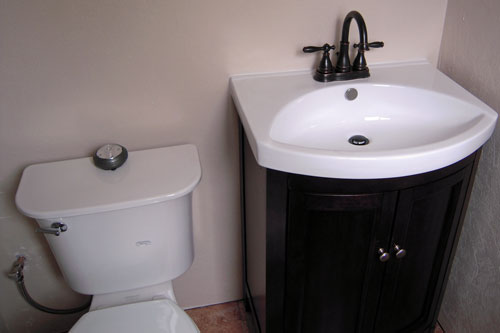
  Bathroom Sink Install by rdpecken on Mar.20, 2011, under Plumbing We are finally getting a sink in the little house.  This is a big step, as before we had to go down to the shed to wash our hands.  With the new sink and bathroom cabinetry, we can clean up better with washing our hands and faces, and also brushing our teeth. We chose an old-fashioned looking model with curved doors from Lowes.  It has a slide out drawer in the bottom, as well as a shelf inside. Sink installed I didn’t take any pictures of the install, but it involved putting a one-way vent on the drain pipe in the wall, and adding two quarter-turn valves for the hot and cold water inlets.  Also, the box didn’t say that mounting hardware was not included, so I ended up going into Kingman to get some supplies. I found that when the sink was flush with the right-hand wall, that there was not enough elbow room on that side.  So I ended up moving it over to the left as much as possible, given the

Bathroom Door Installation

Image
  Bathroom Door Installation by rdpecken on Mar.20, 2011, under Windows & Doors At the end of January, I had done a very temporary job of putting the bathroom door up.  Because the frame was too long for the opening, with the tile floor installed, I wasn’t able to install it in the correct position.  It worked for that weekend, but now I needed to finish the job. So when I arrived in March, this was the state of the door:   Bathroom Door Temporary install As you can see, it is not set into the frame to be flush with the drywall on the other side. From the bathroom side, you can see that it needs to come in a few more inches, but the tile floor is in the way.   Bathroom Door temporary inside image Since I was alone this trip, I thought it might be easier to move the door in place, rather than take it all the way out and reinstall.  I started by measuring how much frame to take off the bottom to allow it to fit in the rough opening. Marking for cut on bottom of

Better Living through Electricity

Image
  Better Living through Electricity by rdpecken on Mar.20, 2011, under Cooking One of the real chores to working and living in a temporary semi-primitive setting is the cleanup involved with cooking.  Without a sink and hot water handy, you have to heat water on the camp stove, and wash things in a plastic bin.  Then you have to pour heated water over the dishes/utensils to rinse them, all the while trying to conserve water, so you don’t have to heat more up making this a long cleaning process. We had tried using a 1100 watt microwave before with our generator, but due to the length of the extension cord, the voltage drop was too much, and the microwave didn’t work unless we plugged it directly into the generator. So I went to Kmart and found a very simple 600 watt microwave to take to the ranch. 600 watt microwave This microwave only draws about 6 amps of AC current, which does not drop the voltage too much, even over a 50 ft extension cord.  I measured the

Generator Maintenance

Image
  Generator Maintenance by rdpecken on Mar.20, 2011, under Ranch Maintenance It’s Spring again, and time to get ready for a new year at the Ranch.  According to Honda, it's necessary to change the oil every 8 hours of operation.   That seems a little excessive to me , so I change the oil once a year, whether my generator needs it or not! The main problem with the EU2000 generator is that it doesn’t have a drain plug for the oil.  So in the past I have tried basically dumping the oil out of the fill tube.  That gets pretty messy.  You can see that the generator gets pretty dirty after a year of operation in the dust and dirt of Northern Arizona. Oil Fill Tube So this year, I got a tool from Harbor Freight to suck the oil out of the fill tube. oil changing tool In order to get better access to the oil, I tilted up the front end, to make the oil pool in the back. Gernerator Tilted Then I inserted the tool and pulled on the handle.  After each pull, I discharged th