Posts

Showing posts from September, 2013

Rain, Finally!

Image
  Rain, Finally! by rdpecken on Sep.16, 2013, under Seasons It has been raining for about the last month nearly every day at the Ranch. Two of our neighbors up there said they recorded more than 10 inches of rain this summer. That’s more than we’ve seen for a very long time. There has also been very cold weather coming with the rain . Here are some pictures of a little greener ranch… Black Mountain    Meadow     Rainy Day...        

Water at the Ranch

Image
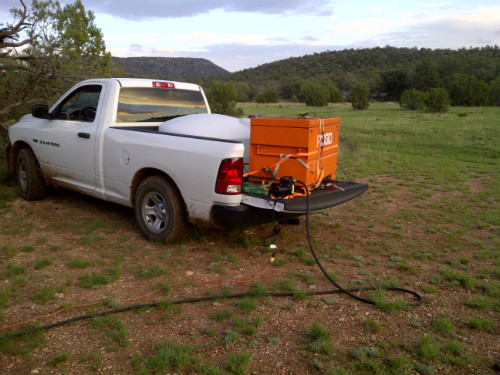
  Water at the Ranch by rdpecken on Sep.16, 2013, under Water System It has become increasingly difficult to get the water man out to deliver water to the LittleHouse. Due to health issues, he is not able to serve as many customers as he had previously. Our solution for this was to equip ourselves with the equipment to haul our own water.  Primarily, this comes in the form of a 210 gallon water tank to fit in the back of our pickup. We purchased this from Tank N Barrel, in Apache Junction, AZ. We fitted the tank with a shutoff valve and a filter. It hooks up with a 3/4″ hose to a pump we purchased at Harbor Freight. We get our water from a public standpipe in Seligman. It costs 75 cents to fill the 210 gallon tank nearly full, and takes less than 10 minutes at the coin operated standpipe. Once we got back to the Ranch, it takes about 20 minutes to transfer the water from the small tank to our 2200 gallon main tank. It’s not ideal, but at least it puts our fate

Solar Installation – Part 3

Image
  Solar Installation – Part 3 by rdpecken on Sep.16, 2013, under Electrical Once the exterior of the job site boxes were complete for the solar installation, the next step was to bolt them to the porch deck. I used carriage bolts to minimize the chance of someone removing them from the outside. Next, I started work on the interior. The equipment was set in place and moved around until a satisfactory arrangement was found for the solar panel installation . Finding positions I couldn’t find any insulators to mount my bus bars for the battery power on. So I made some up using 3/4″ PVC plastic pipe and caps. These were arranged such that the pipe went through holes in the plywood, and the caps placed on either side of the plywood. Then a bolt was run from one side to the other, never touching the plywood itself. Buss Insulator posts At this point, the Charge controller, Inverter, Buss Bars and circuit breakers were all physically mounted on the plywood panel. Wires

Solar Installation – Part 2

Image
  Solar Installation – Part 2 by rdpecken on Sep.16, 2013, under Electrical Once the ground wire was routed from the panels to the ground, they were attached to the ground lug in the combiner box. This box is used to combine the outputs of the two strings of panels into a single pair of wires going to the charge controller. There are circuit breakers installed, mostly to use as switches to isolate any problems.   Combiner box installed The combiner box had been mounted in my previous visit in June. The conduit from the roof had been run and the wires from the solar panels had been pulled through the conduit. Combiner box Once the wiring was complete in the combiner box, I drove a ground rod just below it, and connected a ground wire from the rod to the combiner box. The picture below shows the installation before the lightning protection was added. Combiner Box – minus lightning protection Next, I started working on the job-site boxes. The first step was to remo

Solar Installation – Part 1

Image
  Solar Installation – Part 1 by rdpecken on Sep.16, 2013, under Electrical In mid-September, I went up to install the remaining pieces of the Solar Installation. These included the charge controller, inverter and batteries. Solar Equipment installed in job-site toolbox Prior to hauling the equipment up there, I worked on the panel installation into a steel job-site box. This is intended to increase security for the equipment, as it is installed outside of the cabin. The job site boxes will double as a bench seat on the porch, letting the occupant sit up a little higher so he can easily see over the porch railing. The installation panel consists of a sheet of 3/4″ plywood, cut to fit the interior of the box. It is attached to the box with two sets of latches, one set used as a hinge. So the panel can swing from horizontal (when working on the equipment) to vertical (in operation for ventilation). Fitting the panel for vertical position     Determining the hinge