More Solar Equipment Work
More Solar Equipment Work
by rdpecken on Apr.27, 2014, under Electrical
I made it up to the Ranch on the weekend of April 11th. I had four goals on this trip:
1. Finish installing the solar panels and their equipment box
2. Open the place up after winter
3. Replace the water pump for the cabin
4. Collect pictures to support creation of a how-to guide for the Ranch
I left Mesa on Friday and stopped at the well site in Seligman to fill up our 200 gallon water hauling tank. I verified that if the pump is shut off when you put in your coins for the actuator, you lose your money. So you need to remember to turn the pump switch ON before inserting your quarters.
I also verified that you can feed it as many quarters as you need to pump the amount of water you need. It appears that there is now a $1.00 minimum to start the pump (used to be $0.75). $2.00 gets me about 220 gallons. So I guess about 30 gallons per quarter. So that has gone up as well. I think I used to get about 50 gallons per quarter.
After arriving at the Ranch and opening up the place, I was pleased to find that there was very little evidence of mice. So I think I got the holes and gaps filled in where pipes and stuff enters from the outside. I turned on the power to the water pump and flushed out the antifreeze from the water lines.
When that was done, I hooked up our transfer pump from the tank in the back of the truck to a hose going to our big tank. Then I pumped the water from the hauling tank to our big tank. It seemed to take about 10 – 15 minutes to do it this time.
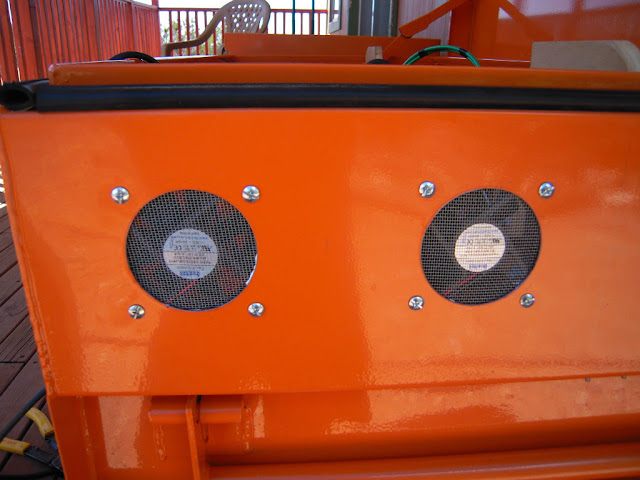
The next day, I started on the solar installation. I started by measuring and knocking out two 3″ holes in the side of the cabinet, near the top. These are where the two fans will be mounted to vent the enclosure. I had access to a hydraulic knockout set that did the job in no time.
Once the holes were in place, I put RTV sealant around the inside surface of the holes, to seal against rain as best I could.
The fans were than mounted on the inside surface, with window screen added to keep out the bugs.
With the fans mounted, I next drilled screw holes and mounted a vent cover on the outside to help keep rain out. RTV was used here, also.
I knocked out two more 3″ holes in the bottom front of the box to allow fresh air to be drawn in from the outside, as the fans exhaust hot air from the side of the box. These were also covered with window screen and a vent cover.
Now that the mechanical work was mostly finished, I started on the electrical work.
In the prior weeks, I had designed, programmed and built a device called a differential thermostat controller. This works to control the temperature inside the box based on both the temperatures inside and outside the box.
Basically, if the inside temp is above 80 degrees and it is cooler outside, I turn on the fans until the temperature drops below 80 or below the outside temperature.
This will save energy by not running the fan 24 hours a day, 7 days a week. And I don’t want to be pulling hotter air into the box from the outside. That would defeat the purpose.
Here is a picture of the differential thermostat controller.
I will add details on the design of this controller over the next few days to my electronics website at www.wb0smx.net.
After installing the controller, I tested it through the next day and noted that it appears to be working as designed.


November 26th, 2014 on 7:59 pm
With this solar setup what appliances are you powering? I am looking to get a solar system for my 400 sqf cabin and I would like to power a apartment size refrigerator a few led lights and a small lcd tv and sat box.
November 27th, 2014 on 8:15 am
Since we are not at the Ranch full time yet, we have two modes that we run in:
1. When we are not physically present (most of the time) the system is lightly loaded. We have the internal loads in the charging system (Charge Controller, Inverter and fans); We have the loads associated with maintaining the internet communications for monitoring and security (Satellite Modem, Wireless Router, Security Camera); and we have the small battery charger/battery for the 12 volt RV pump that gives us water pressure. Finally, we have a 5 cubic foot chest freezer that we are running on an external thermostat to make it work as a refrigerator, rather than freezer. All of this presents a fairly light load to our power system, and we have had no problems maintaining the batteries at a full charge from day to day.
2. When we are physically present at the Ranch, we add a few loads: Laptop computer (about 2 hrs per day), Ham Radio (about 2 hrs per day), 30 inch LCD TV (about 4 hours per day) and a 12 inch table fan (2 hours per day). Additionally, if it is hot out, we will run a window fan in the loft window for several hours during the peak of the day. The timing just lets us take advantage of extra power that is available during the peak hours that would otherwise be wasted.
With a system the size of ours, you should have no problems running the loads you mentioned.
Good luck, and thanks for commenting…
November 28th, 2014 on 2:39 pm
Oh yeah… We also have 7 23-watt compact florescent lights installed, of which we usually only have one turned on at a time, and then only for the amount of time actually needed. We also charge power tool batteries and run power tools (circular saw, miter saw, drills, recipricating saw, jig saw, etc) from time to time. No problems with dragging the batteries down to even 50% yet. But most of that work is done during peak sunlight hours, so again using energy that would otherwise be wasted.