Drywall Work at the LittleHouse
Drywall Work at the LittleHouse
by rdpecken on Jul.09, 2010, under Drywall
I went up over the 4th of July weekend to try to get the drywall work done in the LittleHouse Bathroom. I made pretty good progress, and learned some things that will come in handy as we continue the dry walling of the house.
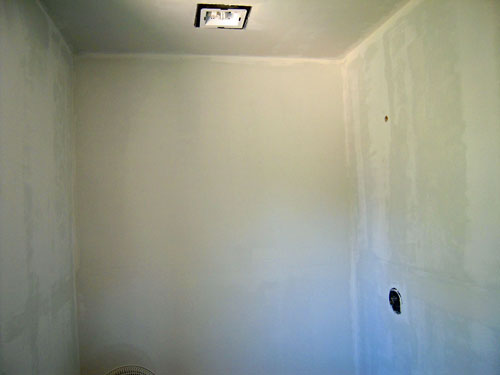 Drywall installed and primed
The drywall had been hung in the bathroom during a previous trip. The goal this time was to tape, mud and texture the walls in there. That will make it ready to start the floor.
First, I installed edging around the door and window. I used the outside corner edging, as it seemed to be a sturdier finish than the “L” type edging. I hope it doesn’t bite me later, when I install the door and window trim. I think we will be OK.
 Edging around door and window
Once that was done, I started taping and mudding all of the corners, seams, and edges. Here is where I started at with blending the edging of the window with the drywall.
 Blending in the window edging
The first layer of mud on the taped seams filled in reasonably, but we still had more to do… I like the meshed fiberglass. It seems easier to work with than the paper tape I used on a project 30 years ago.
 First layer of mud
The area above the door was a real mess. The wood was twisted and uneven when I hung the drywall, and when I set the first screw, it cracked and bent the drywall about a 1/4″. So I had to make several layers of mud to try to blend it all in to a reasonably straight wall. Here is the first layer drying.
 Broken wall mending
The corners were made much easier with the help of a 90 degree trowel. They still cracked as the first layer was drying, but subsequent layers fixed them up pretty good.
 Inside corners were tough
Here is the window area drying after the second layer. It’s hard to show detail when it’s all white from the primer I put down before the texture coat, but it looks pretty good.
 Second coat drying
And finally, I applied a texture coat of mud to the entire surface. I didn’t have a compressor or splatter gun, so at first I tried to splatter it on with a brush. I ended up with more mud on me than on the wall. Similar results were had when I trimmed the brush down to a length of one inch to make it stiffer.
Finally, I just ended up thinning some mud out with water, dipping the stubby brush into the mud, and dabbing it on in a random pattern over a 2′ x 3′ area. Then I came along with a 12″ trowel and knocked down the high spots to create the flat areas. It turned out reasonably good, and I’m happy enough with it. For the next room, I’m going to go ahead and get the compressor and splatter gun to give more uniform results.
 Knock Down finish
I noticed the next day that some of the seams were a little bit noticeable if you looked for them. Apparently, the mud had shrunk overnight (I should have waited a day between coats, but didn’t have time. Because almost all of it will be hidden behind the shower, mirror, closet and towel racks, I’ll leave it like it is. Next trip, I’ll do a final sanding to smooth out some of the rough spots, and apply a coat of paint to the walls and ceiling. That will make all ready for the floor and shower install.


Comments
Post a Comment