Fresh Water Plumbing for the Littlehouse (Con’t 2)
Fresh Water Plumbing for the Littlehouse (Con’t 2)
by rdpecken on Apr.23, 2010, under Plumbing
We went up to the ranch on April 16th for a few days to finish up the fresh water plumbing for the LittleHouse. We plumbed up some 3/4″ PVC in the ground box to create a system of valves that let us select fresh water from the tank, or an antifreeze solution for winterizing the plumbing in the house.
 Inlet Plumbing
The top valve in the picture controls flow of fresh water from the tank to the pressure pump.
The bottom valve controls flow of RV antifreeze solution from a container to the pump.
The pump pressurized side feeds the house out through the left side to the 3/4″ pex pipe.
The 1/2″ pex pipe is just a protective jacket for the power wires for the pressure pump.
We also installed the sillcock assemblies for the hose bibs on the East and West ends of the house. I forgot to take pictures, but here is a diagram of what they are.
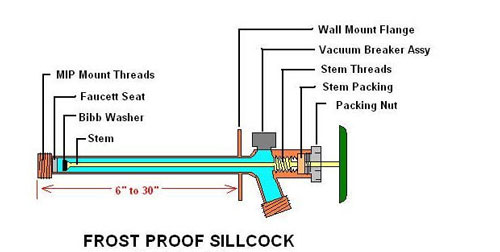 Hose Bib Sillcock
So basically, it just puts the valve portion of the assembly deep inside the insulated area of the floor joists to reduce the chance of freezing.
I didn’t get any pictures of the pump installed, but it has 4 legs made out of 5/16″ bolts that hold it off the ground and above the PVC pipes. The two braided hoses connect to the inlet and outlet of the pump.
 Shurflo Extreme 5.7 gpm Pump
Once the pump was installed, we made certain that all pex on the inside and outside of the house was capped off . We had to add a fitting to the shower supply lines to connect the hot and cold water lines together for the pressure test. Then we turned on the water from the tank, and pressurized the cabin for about a half hour with no evidence of leaks.
Finally, we added foil backed insulation wrap to the supply line from the ground to the floor of the house, and around all the PVC pipes in the ground box. We then added a few inches of dirt/gravel to the bottom of the ground box to bring the level up to just over the pipe levels.
I think our next step is to install cement board in the shower area and mount the shower base and faucet fixtures. Once that is done, we can start to drywall the bathroom.


Comments
Post a Comment