Prefabbing the WashHouse – Walls
Prefabbing the WashHouse – Walls
by admin on Jul.30, 2004, under WashHouse
The Walls
Back at the house in Mesa, we cut and dry-fit the walls and the roof for the wash house.
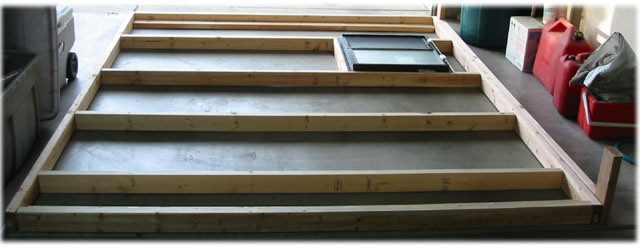
Here is the dry fit of the east wall, with the sliding window.
We made sure that there were studs centered at 4′ intervals from one of the outside edges of the wall. That way the siding seams will fall on a stud.
Corners
The east and west walls included an extra corner stud to allow connection of the adjoining wall and interior wall panels.
The dry fit had it just sitting on the ground, but the corner stud actually is placed on the inside edge of the wall, rather than the outside.
Note on the top that the second top plate (at the top of the picture) is cut short enough to allow the second top plate from the adjoining wall to overlap. This ties together the walls and strengthens the structure.
Window Frame
We found a window that was close enough to 24″ wide that we just placed it between two existing studs.
No header is necessary, since the span is not excessive.
Top Plates
The top plates were designed to overlap adjoining walls, to tie everything together and add strength.
The 2×4 at the top of the picture was just to see if they would fit.
Lesson Learned here:
Remember to add 3 – 1/2″ to the edge you measure from in determining
where to put the studs that support the seams of the siding on the two
shorter walls, because they sit between the other two longer walls.
North/South Walls
These two walls were easy, because there are no doors or windows, and they sit between the east and west walls.
The second top plate is longer, to overlap the east and west walls.
West Wall
This was the most difficult wall.
It has a door rough opening, with the associated header to frame.
The bottom plate is shown separated from the rest of the wall because when it is actually built, the plate under the door will be cut away, so that you won’t need to step over a 2×4! So the door frame needs to reach all the way to the floor.
Door Header
The header only spans 36″, so we used a single header consisting of a 2×6 notched into the supporting studs. with a 2×4 underneath it.
Roof Framing
The roof is made of 2×6 on 24″ centers. There are two rim joists to connect it all together, and each rafter is separated by a soffit block of 2×6 with vent holes.
The vent holes are covered with hardware screen to keep bugs out.
The two end rafters are for looks only
Remember to measure from an outside edge to the center of one of the rafters at 8′ to provide support for two adjoining sheets of sheathing.


Comments
Post a Comment